WATS has been designed to be very easy to setup for any user. Absolutely no code knowledge is required to install and configure WATS. It just takes 10 minutes to go through the options to customize WATS to meet your requirements and then, your customers could start to submit tickets into the system.
Here is the 3 steps procedure to setup WATS from scratch :
I. Install WordPress
First, let’s download the latest release of WordPress. Then just follow the famous 5 minutes install procedure and you are done for Step 1!
II. Install WATS
Second, order your copy of WATS. You will then receive a mail with WATS attached to it. Simply unzip and FTP the plugin files to the “wp-content/plugins” directory. Then get into WordPress plugins page on the admin panel and activate WATS.

III. Configure WATS
This is the last step, just get to the WATS options page on the settings menu. Set the WATS options according to your requirements. If you have a doubt about an option, just click on its title, this will display an inline explanation.
Ticket submission options
Media upload
The media upload option enables registered users to attach files to the ticket in the following pages :
- frontend submission form
- frontend ticket update form
- admin ticket creation page
- admin ticket edition page
Users need to be registered and also have the media upload capability to be able to attach files to tickets.

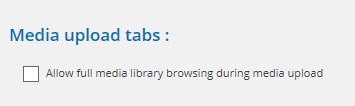
Media upload tabs
You need to check this option if you want to allow users to access all files in the media Library. Otherwise, they will see only their own files in the Library.
Shared guest user
This feature is useful if you want your users to submit tickets through the admin while you don’t want to have a single account per user. So you just create a regular account (with a minimum role of contributor) and then you set the shared guest user option to it. Then you provide the login credentials to your user and you ask them to log into to the system. They will automatically be redirected to the ticket creation page in the admin where they can submit tickets.
The shared guest user could only access the ticket creation page in the admin. So don’t set it to your current admin user as you would directly lose access to other admin pages. It is better to create a special dedicated account for this.

Frontend submission form
To implement the frontend submission form, you just need to add the following shortcode to a post or a page :
[WATS_TICKET_SUBMIT_FORM]

Then you need to set the frontend submission form access option :
- Disable frontend ticket submission form : if you don’t want to allow access to it, useful if you want to temporary disable it
- Enable frontend ticket submission form for any visitor with a valid email address : if you only require users to have a valid email address to be able to submit tickets
- Enable frontend ticket submission form for registered users only : if you only want registered users to be able to submit tickets through the frontend

Finally, you need to configure the ticket publication status for tickets submitted through the frontend :
- All tickets submitted will be in ‘pending’ status : if you want to moderate any ticket before they are published
- Tickets from unauthenticated users will be submitted in ‘pending’ status and tickets from authenticated users will be in ‘publish’ status : if you want to moderate only tickets from non registered users
- Tickets from unauthenticated users will be submitted in ‘pending’ status and tickets from authenticated users will be set according to user level capability : tickets will be directly published only if the user has the capability to publish posts, otherwise, they will need to be moderated first
- All tickets submitted will be in ‘publish’ status : tickets will be directly published without any moderation

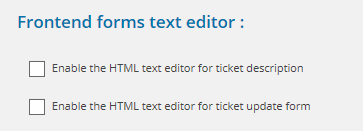
Frontend forms text editor
Here you can enable the WordPress HTML editor for the frontend submission form and the frontend ticket update form.
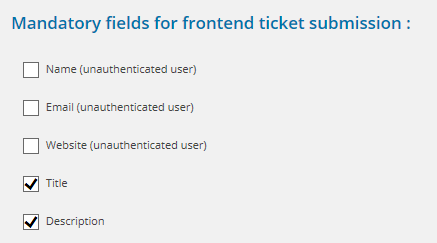
Mandatory fields for frontend ticket submission
Select which fields have to be filled in order to allow the ticket submission in the frontend submission form. Some fields (email, name and website) are only applicable to visitors not logged in.
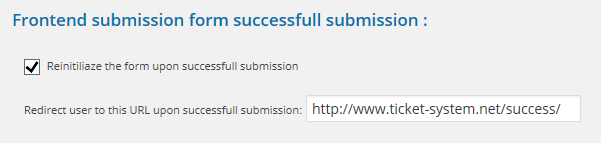
Frontend submission form successfull submission
You can clear up the form upon successful ticket submission. Then, you can also define an URL to redirect the user to after the ticket submission (usually a submission acknowledgement page).
Email ticket submission
With WATS, tickets can be submitted by email. To achieve this, you need to enable the option to allow ticket submission by email and then fill the mail server settings (server name, port, login and password).

You will need to dedicate a mail account to WATS as all emails received will result in a ticket and then be deleted from the server. If you are using an SSL connection, make sure to add ssl:// before the server name.
Default author for unregistered visitors tickets
With this option, you can set which user will be used as the author of the ticket when a ticket is submitted by a visitor that isn’t registered. This is applicable for tickets submitted by email or through the frontend submission form.

Call center ticket creation
This option is useful if you want to allow admins to modify ticket author and thus raise a ticket on behalf of a user calling in.

Call center ticket update
This option allows admins to update a ticket on behalf of a user (same feature as the one above for the ticket creation but for the update).

Ticket display and visibility options
Ticket numerotation
To set the ticket numerotation, just select one of the three options available :
- no numerotation
- dated format (date and ticket ID)
- numbered format (ticket ID only)

The selected numerotation format will then be applied to all tickets and you will get it just before the ticket title.

Tickets display
Select this option if you want to include tickets together with regular posts on the homepage.

Ticket visibility
You have three main options for ticket visibility :
- Anybody (registered or not can see all tickets). No authentication required in this situation.
- Any registered user can see all tickets. In that case, users will need to be authenticated to browse the tickets.
- Only ticket author and admins can see the tickets. Users need to be connected and can only view their own tickets (unless they are admins).
Then if you have set ticket visibility for ticket author and admins only, you can also enable two other options :
- first one is a special capability to allow read only access to all tickets for specific users. Admins can then grant this capability under the user profile for selected users. This is useful when you want to give a view on all tickets to an user that doesn’t have admin privileges.
- second one is to allow users to view and update tickets authored by another user belonging to the same company.

Comments visibility
This item allows you to manage the access to ticket updates (comments). You can check the first option below if you want to prevent regular users without moderate_comments capability to view the comments list. You should check this option if you don’t want users to view updates on all tickets (as ticket updates are WP comments).
Then you can check the second option if you want to allow admins to be able to post internal comments. Internal comments could only be viewed by admins. Regular users can’t see these.

Template selector
Here, you need to define which template to use. By default, WATS will use your active theme single post page. You can also decide to use a custom template specifically for the tickets display. To achieve this, just copy the files from the WATS theme directory to your active theme directory and then edit these according to your needs.

Ticket listing options
User selector format
With this option, you can define a custom format for user selectors. You can include user meta keys in the format. This will allow you to quickly find out users. The default format will include only the user login. But you can replace it to user the first name and last name for instance or any other user meta key. The format defined will then be applied to the user selectors (for ticket assignment, ticket listing filters, etc…).

User selector order
The user selector can be sorted with this option. This is useful to get an ordered list where you can quickly find the user you are looking for. Usually, you will want to sort the list by last name and then first name.

Frontend ticket listing
To implement the frontend ticket listing, you just need to add the following shortcode to a post or a page :
[WATS_TICKET_LIST 0]
You can replace the “0” with a “1” if you only want to display in the list the tickets belonging to the same category as the post where you have inserted the shortcode.
You can also add the ID of a custom query if you want the page to load with the list already filtered according to preset values.
[WATS_TICKET_LIST 0 1]
The 1 here is the ID of the custom query in the list of queries.

Then, you can also set an option to include an additionnal filter in the ticket listing filters. This will allow you to filter tickets based on user meta values. For instance, you can filter on the country or company name of the ticket author (if you have enabled these) or any other that is available. Just turn on the option and then select the appropriate meta key.

Finally, you can include an additionnal column in the ticket listing table. This column will be filled with ticket author user meta values. You can select any user meta key for this column.

Active columns in ticket listing table
Just select the columns you’d like to see in the frontend ticket listing table.

Custom queries
You can define an unlimited number of custom queries and then call them via the shortcode as previously described. This allows to define multiple ticket listing, each in a separate post, with a specific custom query that will be applied on page load. For instance, you could define a query with all opened tickets or all closed tickets. Possibilities are endless.
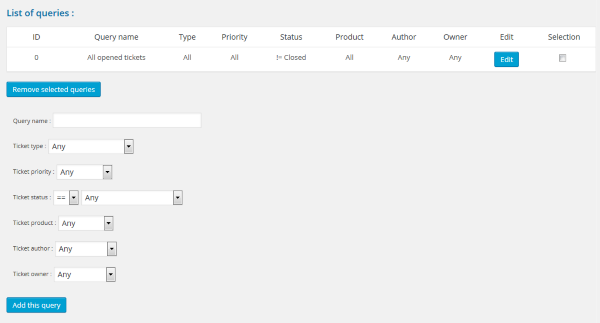
Default query
This option allows you to set which query will be performed for the frontend ticket listing to populate the table whenever you haven’t specified a custom query ID in the shortcode call.

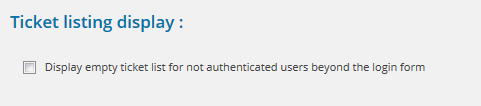
Ticket listing display
This option will display an empty ticket listing to non logged in users when authentication is required to view tickets.
Ticket keys options
Tickets tagging
By selecting this option, you will enable the tags meta box in the admin ticket edition page. This is useful if you want to tag the tickets.

Categories opened to submission
You need to define which categories are opened to ticket submission. Then these categories will be available in the ticket creation page. This will allow you to direct tickets to specific categories and prevent other categories from receiving tickets.

Ticket keys
Select which keys you want to enable. You can have : ticket priority, ticket status, ticket product and ticket type. You will then be able to set the current value for each key in the ticket creation and ticket update pages. If you don’t need a key, just disable it.

For each key (type, product, priority and status), you can configure pre defined values that will then appear in the different selectors in the ticket creation, edition and update pages. You can also set a default value (the one to be set by default in the selector). You can easily add, remove and edit entries for each ticket key.

For the ticket status key, you can configure which key is the “closed” status key. When a ticket will be set to this status, only admins could update and reopen it. Other users won’t be able to add any update as the ticket would have reached the closed status.

Custom fields
By selecting this option, you will enable the custom fields meta box in the admin ticket edition page. This is useful if you want to associate some custom fields to the tickets.

Custom fields management
This feature allows you to define an unlimited number of text inputs, datepicker, checkbox, drop down selectors and radio button that will be used as additionnal data entries for the tickets.
When you define a datepicker custom field, you can then reuse it with the due date notification feature in the definition of notifications rules.
For each custom field, you need to indicate :
- The display name : custom field name displayed in the ticket template
- The DB meta key identifier : identifier used to store values in the database
- Custom field type : text input, datepicker, checkbox, drop down selector or radio button
- Frontend submission form : whether to hide or enable this custom field for the ticket submission (for all users or admins only)
- Admin ticket edition page : whether to hide or enable this custom field in the admin ticket edition page (read/write access for all users or admins only)
- Frontend ticket display template : whether to hide or display this custom field in the ticket display template (for all users or admins only)
- Frontend ticket update form : whether to hide or enable this custom field in the frontend ticket update form (for all users or admins only)
- Frontend ticket listing filter : whether to hide or display this custom field in the frontend ticket listing filter (for all users or admins only)
- Frontend ticket listing table column : whether to hide or enable this custom field in the frontend ticket listing table column (for all users or admins only)

Ticket assign options
Ticket assignment
Here, you can configure the option about ticket assignment. The ticket can be assigned to user that will have ownership for it. This is useful to identify who is currently working on a ticket. You have three settings :
- No assignment possible : if you don’t want tickets to be assigned to users
- Everybody can assign a ticket : if you want to allow any user (whether registered or not) to assign a ticket
- Only registered users can assign a ticket : if you want to allow only registered users to assign a ticket
Obviously, to be able to assign a ticket, the user will need to have visibility rights on it.

Target users for tickets assignment
This option allows you to set which users can be assigned to a ticket. The list of users in the ticket owner list will be restricted according to this setting. You have three settings :
- Any registered user : any registered user can be assigned to a ticket
- Ticket originator and admins : only ticket author and admins can be assigned to a ticket
- Ticket originator and any user with wats_ticket_ownership capability : only ticket author and users with the wats_ticket_ownership capability can be assigned to a ticket. The wats_ticket_ownership capability can be granted by admins to any user under the user profile

Roles with ticket assignment capability
This option is an extension of the ticket assignment option. If you have set it to allow only registered users to assign tickets, then you also need to select here the user roles that are allowed to assign tickets.

User profile options
User profile administration
These options provide you additionnal control on the user profile :
- Email option : check this option if you want to prevent regular users from modifying their email address under the user profile page. If checked, only administrators could update it.
- Expiration option : check this option to allow administrators to set an account expiration date for each user. User won’t be able to authenticate after the expiration date.
- Country option : check this option to allow administrators to associate each user with a country. You can then customize the country meta key.
- Company option : check this option to allow administrators to associate each user with a company name. You can then customize the company name meta key. When this option is enabled, you can create and manage companies through the company management page.
- SLA option : check this option to allow administrators to associate each user with a service level agreement. When this option is enabled, you can assign SLA to companies through the company management page or individually under the user profile page.

Notifications options
Notifications
Here, you need to select which notifications you want to enable. You can enable 4 kind of notifications :
- Notifications for admins when a new ticket is submitted
- Notifications for admins when a ticket is updated
- Notifications for ticket author and updaters when a ticket is updated
- Custom mailing list for update notification
There is also a bypass mode option. When you enable it, it will enable user level settings for the three kind of notifications. This will allow admins to disable notification options for specific users. This gives user level granularity for the global options.

Mail notifications signature
You can easily customize the signature of every notification email by filling the text area with your signature. Then every notification will contain this signature.

Source email address
Setting this option will allow you to override the source address used into the notifications email with the current user address. This is useful if you want to clearly identify who has created or updated a ticket directly from the source address.

Ticket notification rules
This option can be used to define specific rules. Each rule will associate specific ticket keys and ticket author conditions with a mailing list. When a ticket matching those conditions is opened or updated, then a mail is fired to the designated list of emails. You can also include in the distribution list the ticket author, the ticket owner, the administrators and all the updaters (people who have posted an update to the ticket).
For instance, you can define a rule to send a notification to a specific email address when a ticket with priority major is opened by any user from United States. You can associate a priority, a status, a type, a product, an author country and an author company.
This option is quite useful if you want to fine tune which notifications are sent to whom. It can be used to provide some alerts for emergencies (tickets with a specific priority) for instance.
You can also configure the notifications to be sent out at regular intervals as reminders of opened ticket when a due date is approaching or crossed. This is very useful to not lose traction with ongoing tickets. The due date is a custom field that you will set during ticket opening and that you can then update later based on your needs.

Statistics options
Global statistics dashboard widget roles visibility
In this option, you need to select which roles will be allowed to view the statistics widget in the dashboard (admin side).

This will enable the below widget for selected roles.
